


Renovating or adding a kitchen island to your NYC apartment? Here's a checklist

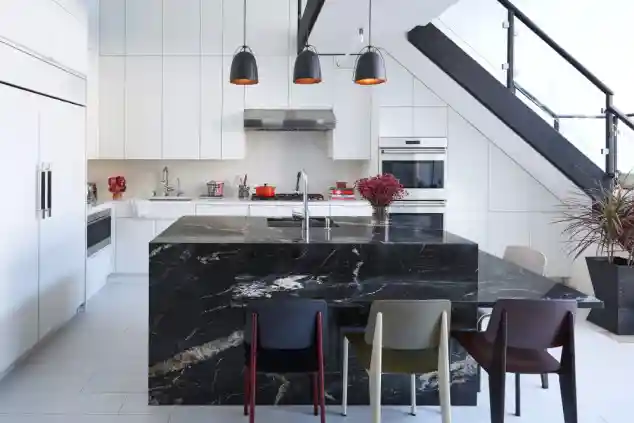
Interior designer Jenny Dina Kirschner added a family-friendly, cantilevered ledge to the black quartzite island in her own Dean Street loft.
Ryan Dausch
The past year has seen a seismic shift in how we spend time in the kitchen, and that's not likely to change post-pandemic. More than ever, having a kitchen island to gather around is a must—going hand in hand with open floor plan living. Only now, rather than simply offering much-needed cooking prep and (hidden) storage space, an island has become the hub for many New York families, doing quadruple duty as a casual dining area and homework station.
While large kitchen islands are a staple in houses, scaled-down, strategically designed ones can boost the efficiency and ease the space crunch New Yorkers are feeling these days. And adding (or replacing) an island could even be a stand-alone upgrade to your existing kitchen should you have sufficient space but lack the budget—or the need—for a complete do-over.
When part of a total kitchen renovation, however, you do have much more leeway in choosing the size and layout and other features to create the end-all, be-all island that is seamlessly integrated into its environs. Either way, thoughtful planning will ensure your island is multi-functional, stylish, and comfortable enough to accommodate everyone in the home and every desired need.
To help you evaluate all the considerations, Brick Underground created this checklist for creating the opportune kitchen island for your situation.
Choose a configuration that fits your space
A freestanding (typically center) island gives you four sides to work with, though sometimes a peninsula that's attached to a wall is the more practical (or only) option. An L-shape island can create more space for dining, with stools surrounding the shorter extension.
"The floor plan will dictate the placement of the island, as will the circulation and how many people are in the home," says Yaiza Armbruster, principal of Atelier Armbruster, a NYC-based architectural and design firm.
For a loft in Tribeca (below), Armbruster pushed the kitchen into a niche with a raised ceiling to maintain a large uninterrupted space for living and dining, Here a peninsula attached to a wall made the most sense. The owners, who cook (and used to entertain) frequently, requested a raised section at bar height to serve as a visual block for all the chopping and prep work. (The stone is Bianco Santa Caterina marble from BAS Stone, one of her regular sources.)

No matter the shape, the key is to have enough square footage around the island, with at least 36 inches on all sides being the general rule of thumb.
Armbruster likes to have 42 inches between the island and the perimeter countertop. This allows two people to work back-to-back and equates to two full steps "rather than the awkward one and a half" need to reach for things. (Architects are nothing if not precise!). She also likes to have the island be an inch shorter than the countertop, saying this one trick makes the island feel less bulky.
For Jenny Dina Kirschner, principal of JDK Interiors, a Brooklyn-based interior design firm, 42 to 48 inches is the sweet spot. "Beyond that it starts to be non-productive—you will literally be walking from the island to the countertop," she says.
She does however recommend a 50- to 60-inch allowance in an eat-in kitchen (such as in the Brooklyn townhouse below) so the seats aren't constantly backing into each other.

Note that waterfall islands, where the same surface cascades over the sides, are prized for being sculptural and for creating a sleek overhang for dining. (The one above is Super White Marble.)
Yet Armbruster says in certain situations (such as in her own kitchen, below), these can feel a bit "too precious." In those cases you can just use stone or other material on the countertop and wood cabinetry underneath.

Maximize the storage capacity
It's a long-established rule that even large kitchens never seem to have enough storage, not to mention the challenges tighter spaces impose. Kirschner names storage as her clients' top priority.
The standard depth for a cabinet, even with a dishwasher, is 24 inches, and if you have the room for additional depth it can be used for more storage.
Kirschner's approach is to create a 36- or 40-inch deep island that's long enough to house three or four stools in a recessed area, with cabinets on either end instead of just closing it up, such as in the following example (the surface is Arabescato Vagli A1). "People forget you can have that extra space," she says.
Armbruster did a similar trick in her own kitchen, with additional depth—so 24 inches on the kitchen side (and where the stools are parked) plus 12 inches on the living room side. "Whenever possible I like to avoid having upper storage and then use the island to replace that reduced linear storage."
Even the seating area can be mined for storage. Kirschner recently designed an island with an overhang for counter stools, putting eight-inch-deep cabinets in front of the stools to house a surplus of wine glasses and kids' art supplies. "That's a way to take advantage of every inch of space for other than everyday items without having your feet kick the cabinets," she says. Similar to countertop cabinetry, you can take advantage of space-expanding inserts.

Make it comfortable for informal (or everyday!) dining
An informal survey of New Yorkers indicates a good majority of us are eating every meal at the island these days, so comfort is absolutely critical. Armbruster (and this writer) are right there with them.
Case in point: One of Armbruster's clients—a family of five—wanted an island for breakfast among other purposes even though they have an adjacent formal dining area. She designed a countertop-height island with a custom, one-inch-thick, poured-concrete slab that resembles a table from the living area and offers limited prep space on the other side of the column near the sink and refrigerator. (The concrete was installed by Trueform, which gets high praise from Armbruster.)

Here are some standard measurements to consider. Plan for at least 24 inches of width per person and make sure there's a clearance of 9 to 13 inches from the seat (or really your knees) to the underside of the ledge.
By all means get seating that's matched to the height of your island. A counter stool is what's meant for the standard 36-inch-tall countertop, while a barstool is designed for a 42- to 48-inch-tall surface, such as when there is a step-up in the back (not so common these days).
An idea that Kirschner frequently employs is to have a dropped-down ledge so that regular chairs can be used, including the cantilevered wraparound at table height around her own sizable island (at top).
"My kids were very young when I designed it and I was afraid of them falling off of counter schools and didn't want to have to always pick them up to put them on the stools either," she says. Plus a lot of people don't find eating on a counter stool as comfortable as a regular chair.
And if seating at the island is the only option, take a cue from Kirschner's design (below) for a tiny pied-à-terre with a one-wall kitchen and zero room for even a two-seat dining table in the living area. The boxed-in counter-height island has kitchen-facing cabinetry and then lowers to table height. "This can be a great solution for any city kitchen where space is tight."
Go for style and substance (and resale value!) when picking the surface
For starters, you don't need to match the island surface to the countertop, though that's often the default. Kirschner went with a striking black material for her own island (in the main photo), keeping the perimeter neutral in case future buyers preferred something more subdued—and then could just replace the island.
As for which material to choose, know that a preponderance of New Yorkers (and designers) remain enamored with marble and other natural materials that mimic the look of marble.
Michal Abehsera, architectural sales representative for Artistic Tile (one of Kirschner's go-to sources for its curated selection), says nine out 10 NYC clients go with white marble, despite its being porous and therefore at risk of etching and staining. That includes some high-end condo developments, including 32 East 1st St. in the East Village and The Belnord on the Upper West Side. "People love to be able to choose a slab that no one else will have, and that's a big part of marble's appeal," she says.

What's more, Abehsera points out that marble is timeless and always sellable, "and it can be easily restored, which is not the case with a man-made surface."
Lyndsey Belle Tyler, vice president of marketing and creative director for ABC Stone (a favorite of both Armbruster and Kirschner), says New Yorkers in particular tend to accept and appreciate how gracefully marble ages, with that natural patina making it all the more gorgeous. Plus, you can seal it and be careful not to let spills sit too long.
Armbruster endorses that idea and even bought two slabs of rare Calacatta Turquoise (from ABC Stone) before she even bought her home (above) and has since used it for the countertop and island surface.
Yet as much as you may covet marble, that might not be the most prudent choice. "We love to cook and drink wine and have two young kids in the home, so we are about protecting our investment," Tyler says. And it turns out a lot of people who are in the same boat make that same calculation and go with something hardier, particularly quartzite. (Want to know more about your options? Brick Underground has the details on great alternatives including quartz, quartzite, porcelain, and soapstone.)
Kirschner too encourages people who are scared of using marble to go with quartzite, another natural material that's not to be confused with quartz. "It has the veining of marble but is almost as durable as granite and handles wear and tear beautifully." She chose Belvedere quartzite from ABC Stone for her own kitchen.
Quartzite is also much friendlier on the budget, ranging from $35 to $45 per square foot as compared to marble. For that you can expect to spend $50 per square foot for a basic two centimeter Carrara slab and all the way up to $400 per square foot for statuary three centimeter Calacatta Gold, with a whole host of options in between. (These are retail prices; your designer can get them at a discount.)
For example, Abehsera priced the Arabescato Vagli marble used by Kirschner in the two projects above at $80 to $120 per square foot depending on the grade.
Then there's granite, which has for sure fallen out of favor in NYC (chalk it up to speckle overload) but is still the most durable natural surface on the market.
So when the clients of an East Village apartment who were concerned about marble requested granite, Armbruster relented and found Belvedere granite from BAS Stone. "It is actually beautiful and looks remarkably like black marble." According to Tyler, granite is available in more interesting finishes these days. Pricing ranges from $50 to $200 per square foot.

Tyler also recommends Lapitec (below), a brand of sintered stone from Italy that similar to granite is etch-resistant, anti-microbial, holds up well to heat and cold, and has through-body veining (meaning it will be visible in cut edges). Pricing ranges from $15 to $40 per square foot depending on the thickness.

Whichever material you decide on, both designers strongly advise going to the stone yard (with all the Covid precautions), where you can see and touch the slabs in person. "It's inspiring and the stone will look much different than in a photograph or a four-inch sample," Kirschner says. You might also discover something entirely different than what you set out to find, which according to Armbruster happens quite a bit.
Of course these days virtual visits are the next best thing. You can make appointments with both ABC Stone and Artistic Tile (along with other companies not mentioned here) to view their comprehensive digital catalogs.
Finally, Kirschner says clients sometimes try to skimp on the cost of fabrication but it can make all the difference in the outcome—especially for cantilevered or drop-down elements, as those are engineered. "A lot of fabricators may simply say what you want is not possible or worse yet do them without the proper skill set, when what you want is someone that can make that the perfect mitered edge." (She recommends PR Stone.)
Be strategic about the lighting
First and foremost a kitchen needs to have sufficient lighting, with downlights (aka recessed lights) the primary source and pendants or other fixtures over the island providing ambience for dining and even task lighting for studying.
The lighting will add another decorative element too.
For her own kitchen, Armbruster chose a single oversize pendant from CB2 (at $299, a much more affordable choice than the limited-edition French fixture she really wanted) as a less expected alternative to having two or three pendants. (It also reminded her in a good way of breeding lamps for chickens, a cozy concept for warming her own brood.) "The radius of where the light shines is where we gather, and the left side is where the sink is and the other where all the detritus accumulates." If all the other lights are off, this is what pulls everyone in.
For even more ambient lighting, she likes to put inexpensive porcelain light sockets from the hardware store on the kitchen wall and either pair them with a beautiful big bulb or silver-capped incandescents.
Kirschner prefers using multiple fixtures but says it is important to find the delicate balance between having too many or too few for a given area—spacing is key in having a proportional feel. "Be mindful too of having the island pendant coordinate with other decorative fixtures in the sight line, especially in an open floor plan," she says.
Or you can skip pendants altogether. Armbruster explains the owners of the East Village apartment with the granite countertops (below) did not want anything to compete visually with the imposing fixture over the adjacent dining table. Just make sure there's ample lighting overall in the kitchen area.

Think twice before adding a sink or cooktop
Putting a sink along the wall, preferably under a window with a view, is not always an option in city kitchens. Even if there is room in the perimeter, putting a sink in the island frees up space in the countertop and sometimes best achieves the established principle of kitchen design: A functional "work triangle" tracing the path from the range, sink, and refrigerator.
When space allows, Kirschner likes to put a larger sink in countertop and a smaller one (but not just a prep sink) in the island. "I and most of my clients do a lot of cooking and entertaining, and having two sinks is amazing," she says.
As for any concerns about water splashing everywhere—it's really no different than a countertop sink. And unlike when a sink is right up against a wall, you don't need a backsplash since there's no risk of the water seeping into the sheetrock, though Armbruster did put a backsplash on the island with the raised bar section.
Despite putting a sink in her own island (albeit a small one to avoid cutting into a lovely vein in the marble), Armbruster says she sometimes likes it when an island can be truly a furniture piece, sans sink. Onn the other hannd, she has lately become keen on installing retractable downdraft range hoods that lower when not in use, such as by Wolf ($1,630 to $1,875) and Gaggenau ($4,599 for the 47 inch model). Viking ($1,799) and Bosch ($1,500) are other options. "They work really well so I am more inclined to put cooktops in the island, especially because they are so beautiful now." A particular favorite are the sleek gas cooktops with minimal burners by SMEG ($1,250).
Kirschner on the other hand is staunchly opposed to putting a range in the island. "I definitely get the appeal but that becomes messy and even hazardous, so I have never done it," she says.
Let your own planned use of the island be your guide.
Don't skimp on electrical outlets
Most importantly, you are required by code to have at least one outlet, more if the island contains a sink or cooktop (your contractor will know the drill). Armbruster says ideally you would have one on each end.
If you plan to do the bulk of your prep work here, you may want to place outlets in convenient spots for smaller appliances; it's also nice to be able to plug in chargers for all your devices, especially if kids are hanging out here.
There are ways to make the outlets discreet, such as by hiding them under overhangs. Kirschner put black switchplates under the cantilevered ledge in her own kitchen. In another, she hid an outlet inside one of the cabinets in case the owners (or future buyers) want to eventually pull out the shelves and install a wine refrigerator.
In the granite island above, Armbruster included a strip that runs the entire width, with a plug every 10 inches. She also buried an outlet in a cabinet for a KitchenAid mixer that's integrated into the millwork—when the hydraulic drawer is opened, the mixer rises up to countertop height and then once you've cleaned it, it can be lowered back down.
So there's really no end to what you can do in a kitchen island with some old-fashioned ingenuity and modern-day know-how (read: a smart, savvy designer).
You Might Also Like


