


Redo your creaky, crooked kitchen floors in a long weekend: Part one
At the start of our renovation in spring 2012, we divided our plans into two groups to help us priortize: the projects we could do ourselves and the few that required a professional hand.
The bathroom needed a pro, as did the office/guest nook. And though the kitchen was in serious need of everything, with a few bare necessities like appliances and open shelving for storage, we were able to turn a bare room into a kitchen we loved. Still, we assumed fixing the hardwood floor would surely fall outside the DIY realm.
By the end of 2013--a good year and half after we had hastily thrown together a functioning kitchen and slapped some paint on the walls--the shine had worn off. In fact, "worn" may be the kindest word to describe the floor.

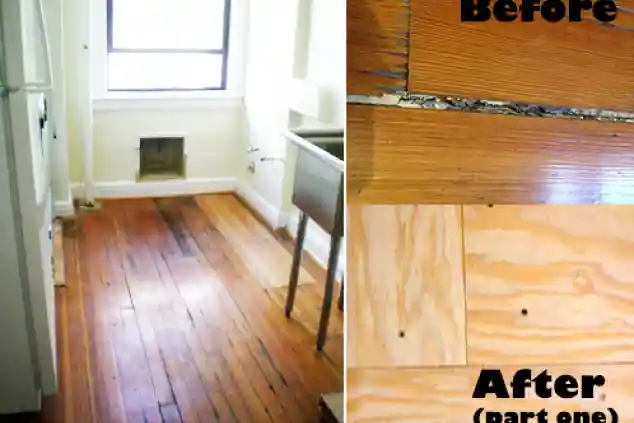
Mayra's kitchen floor, shown above, left plenty to be desired.
Bouncy as a trampoline in some spots, the floor creaked and squeaked and there were large gaps between boards. It was also dangerous: certain rusty nails would pop up all the time, and no amount of hammering or wood filler could keep them down. Wood chips would splinter off every time we cleaned it with a damp Swiffer. We started researching and planning what we could do to remedy the situation.
With help from my father, a handyman who agreed to visit a few months later to help with the work, we were able to fix the floor (technically the subfloor) in about a day--without spending more than $170 in materials.
Laying out and securing most of the boards took a day, and since we had to use loud tools, we stopped working at 6pm to keep peace with the neighbors. We finished up in a couple of hours the next day.
Build on top of what you have
The trick to keeping things simple: don’t rip up the floors. Much like our DIY kitchen backsplash project, we used plywood to create a new surface on top of which we'd install the new flooring.
In effect, we created a new “subfloor” on top of the existing hardwood. That way, we minimized the work (no demolition!) and if we ever want to go back to the original, it's still there.
The disadvantage is that the kitchen floor will be higher than the other original floors in the apartment. But since the kitchen is separate, I didn’t mind. The 3/4-inch thickness of the plywood was sturdy enough as a new subfloor and still thin enough so that the floor wouldn't come up too high.
Getting started
The kitchen measures 94 square feet (roughly 7.5 by 12.5 feet). Since the plywood came in four- by eight-foot sheets, we bought three at around $47 each. We also bought three-inch drywall screws, silicone caulk, and plenty of our favorite construction adhesive, PowerGrab.
The first thing we did was to stabilize some of the loose floor boards. We pre-drilled holes into the strips of hardwood and then followed with three-inch screws, hoping to hit the original subfloor beneath (and also hoping the subfloor was still secured to the floor joists).
We managed to screw down the worst offenders. But since we suspect that the original subfloor is not in the greatest condition (evidenced by detached floorboards and nails that pop up and refuse to stay), we knew those new screws may still come loose. Better to create a new subfloor altogether.

We had to have the four- by eight-foot plywood pieces cut in half so they would fit in the car (Home Depot does this for free). Of course, any cut in the sheet makes the floor a little less sturdy. To reinforce them, we laid down the pieces in staggered, almost random, positions. This way, you never step on a long seam, and you never have four corners of plywood joining (see photo below). Any seam creates a weakness.

Once we had laid out the plywood boards, we secured them to the floor, first by slathering the backs with PowerGrab and then pressing them down until they stuck.
Then, we pre-drilled holes into the boards and through to the floor (sub-sub-floor?). Before we screwed the boards in place, however, we wedged thin strips of wood or thick cardboard between the edge of the board and the wall. This ensured there was space between the board and wall left for some wood expansion.
Next, we put in the three-inch coarse drywall screws. Every once in a while the drill would hit a preexisting nail or screw. That was annoying because it meant having to drill another hole hoping not to hit another screw. But in the end it didn’t matter because any and all holes are covered by wood putty.

Our work got trickier at the edges of the kitchen since we had to cut smaller pieces to fill the area, fitting around corners, the kitchen steam pipe and the not-so-straight walls. For this kind of work, it really helps to have the right tools. For longer cuts, we used a circular saw. For finer cuts (like cutting a semi-circle, below) an electric jigsaw worked fine.

Once all the boards and pieces were screwed down, we caulked all around the edge of the new floor to seal it, and then we filled in small cracks, seams and drill holes on the surface with wood putty.
And then, for the first time in a century (I imagine), we walked onto the kitchen floor, and nary a creak was heard. The subfloor is strong and ready for any flooring we may want to put on top.
Now what might that be? The possibilities are almost endless: hardwood, tile, laminate, cork… But I think, for our budget, it has to be the classic, yet deeply misunderstood, linoleum.
Next up: Time to top up the floors.
Related posts:
NYC Renovation Chronicles: A step-by-step guide to a DIY kitchen backsplash
NYC Renovation Chronicles: Where to find inspiration that actually works in a NYC apartment
NYC Renovation Chronicles: Trimming down the fridge
NYC Renovation Chronicles is a bi-weekly column focused (obviously) on renovation, NYC style. Helmed in the past by an architect, a kitchen and bath designer, and a general contractor, the column's new steward is co-op renovator, real estate porn addict and Harlem resident Mayra David. She'll focus on what it's like to DIY or HSI (= Hire Someone Instead) in NYC.


