NYC Renovation Chronicles: 3 DIY projects worth trying yourself

After marshalling our resources and prepping our apartment, we were finally ready for our various DIY renovation projects. Reinstating the French doors between the dining and living rooms, refurbishing the radiators, and refreshing a dining hutch were at the top of our list.
We did not give ourselves a deadline date (or month) for finishing all of our DIY renovations, as we prefer to think of home improvement as a way of life, not a phase in life.
That said, I do recommend setting the goal of getting a room to the point where you have full use of it. It’s not only a clearer, more specific goal--visualizing the work room by room divides the whole apartment renovation into room-sized chunks--it’s also a better motivator (I find). And it’s much easier to contain dirt and dust if you’re only working in one room at a time, instead of having projects all over the apartment.
Below are three of my recent DIY projects, with tips for pulling them off yourself.
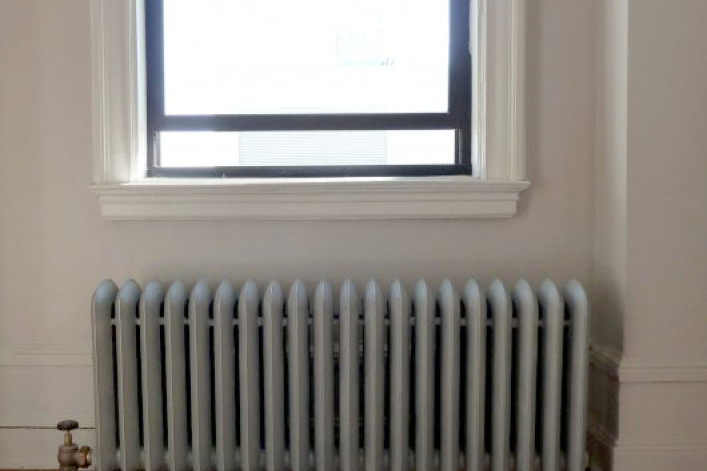
Refurbishing the radiators
Many apartment dwellers probably face the same eyesore we did--old cracked and chipping cast iron radiators. There was no way I was going to live with our radiators in that nasty looking state.
Unfortunately, having them sandblasted was not in the budget.
The price for full sandblasted restoration, including powder coating in a color of one's choice, varies by size. Our 2’ by 4’, 20-fin radiator would have cost $425. Also, we would have to move the cast iron monstrosity ourselves and bring it to their premises. (For an extra fee, they will do curb-side pick-up and delivery, but they will not enter the building.)
My goal, instead, was a nice even coating of paint.
I knew it would be a challenge to get in and around the fins with a brush. Not to mention, I could already imagine the brush or sponge snagging on the cracks in the paint. I didn’t feel up to stripping the paint off myself. So, I opted for the third way: A thorough cleaning, and an easy-peasy spraypaint job.
Our radiator looked like it had never, ever been given so much as a dusting. Cleaning was not a pleasant job, but at least it didn't take too long. In between the fins were strands of cobwebs and dirt. I used my trusty 14-in-1 painter's tool to scrape off any loose paint chips and get out all the debris between the fins. I used old rags to wash and dry between the fins. It took me about an hour to get it to the point where it was ready to receive paint.
For the painting portion of the project, a driveway or lawn would have come in handy--and any can of spraypaint warns against using the stuff indoors--but I had neither.
Turning to Hollywood, I drew inspiration from the hit TV show Dexter. That meant turning to my stockpile of trusty 6 millimeter plastic sheets and painters tape. I set up my very own ‘kill room’ around one open window (and the window frames thoroughly protected) and the radiator turned so I could access every angle.
Two cans of Rustoleum High Heat Spray in Silver later, we had one thoroughly clean 20-fin radiator, looking fresh and like-new.
If you want to do a thorough job, you should disconnect the radiator first, as we did, to clean and paint the other side of it, too.
We had a plumber come in to disconnect and drain the radiators. Luckily, our building paid because the plumber had to disconnect the radiator as part of a separate repair the building was responsible for: they were replacing the on/off valves. After he replaced the valves, I asked him not to reconnect the radiators. But the plumber said it would have cost me $100 - $150 for him to come in later and re-connect the three radiators we had in the house. When the time came to reconnect them, we simply asked our super to do the job. It took about ten minutes. We tipped him $20 bucks.
Sprucing up the furniture
Soon after we painted our dining room, we bought an old dining hutch from a great little company we found on Craigslist called Forgotten Furniture. They sell second-hand, vintage furniture and deliver it right to your apartment. (They even gave me a discount on the delivery fee because I let them decide when they could deliver it. It arrived within a few weeks.)
Now, I had been dying to do a furniture make-over. After months of patching walls and stripping paint, I wanted to do some decorating! But this meant sanding and washing down a huge piece of furniture. We wanted to avoid having to wipe down our freshly painted walls; they were dry, but not yet “cured” (curing can take two weeks to a full month). So, we sanded the whole thing by hand using sandpaper and elbow grease while simultaneously vacuuming it with our shop vacuum nozzle. It worked like a charm.
We also frequently wiped the wood down with a damp rag during the sanding process. To protect the floors, we of course used plastic sheets, which was especially useful when we were washing the hutch inside and out with soap and water.
This second-hand piece got a facelift that includes sanding, vacuuming and painting.
After that, painting the piece was fun. Another little tip: If you’re a rookie DIYer, get professional advice whenever you can. The dining room paint wasn’t quite the color we thought it would be on our walls. I quickly emailed an interior decorator, Kylie M. Interiors whom I simply found by Googling. I asked her how best to work with the wall color, which I refused to paint over. Within hours, she emailed back. She recommended a specific paint color for the huge hutch to"‘ground" the wall color. It works beautifully. I also have a better understanding now of paint undertones and whatnot.
French door fix
When we moved into our apartment, we knew we wanted to replace the long-lost French doors that had once separated the dining room from the living room. At first, we thought it would be a great idea to replace like for like, and find old French doors in salvage shops like the Demolition Depot and BigNYC. We were gobsmacked at how expensive sets of doors could be at the Demolition Depot. We’re talking in the ball park of $1,500- $3,000 for a set of old, chipped, doors encrusted in 20 layers of paint! BigNYC is infinitely more affordable, but you do need either some luck or some time before you find a matching set of doors.
But the main reason we ended up getting regular ol’ 36", 15 lite $128 French door slabs from Home Depot (FYI "slab" is a door minus its hinges and frame, a "lite" is a glass insert) is that they gave us a simple way to transport them and other materials from their store.
The new French doors Mayra scored from Home Depot.
We have a small car -- large enough for luggage, but small enough for most parking spots. It would not fit two doors and several feet of 2-by-4s and moulding. (It really answers the question 'What on earth is the Chevy Suburban for?') However, for $19.99, you can rent one of their trucks and haul everything home yourself.
Of course, there are surcharges: bridge toll for us, since we got the truck from a Home Depot in NJ. You also have to return the truck with the same amount of gas in the tank. But you get 75 minutes for $19.99, and that was enough, believe it or not, to get us from the Home Depot in Lodi NJ (Route 17), to our home in Harlem, to a gas station in NJ, and back to the store.
And there’s also the option to have everything delivered. Home Depot and Lowe’s both have a delivery service. Delivery fee depends on the distance from the nearest store. For Lowe's, a delivery to Manhattan will generally cost $79 regardless of how much you buy -- this includes lumber, tools, doors, etc. They can usually get the delivery out to you within a few days, sometimes even the next day. They also have a parcel service with free shipping for purchases above $49.
My advice: when you’re sourcing bulky items, always take into consideration what it will take for you to get it home. Sure, it’s very gratifying to walk into a store, and come out of it with all the materials you need. But getting stuff delivered to your apartment -- i.e. not worrying about damaging fragile items, not having to fit it into a car, not having to fit it in the elevator, or worse, carry it up flights of stairs -- is often well worth the expense.
And now, the secret weapon to a successful DIY job: call Dad. Ask him to leave suburbia for a bit and help you out.
My father arrived with chisels and door hinges and a know-how about installing doors that would impress Bob Vila. To paint them, my father suggested covering all the door lites with tape and using spray paint on the doors.
Watch out Bob Vila: Mayra's dad "notches" the doors with a chisel before attaching the hinges (this allows the hinge's door wing to lay flush on the side of the door, ensuring proper installation of the door into the frame).
This would give a nice, even coating, without producing paint drips. Good plan! But I can't implement it yet. The doors are installed, but still in their plastic wrap. This is because, while the dining room is done, on the other side of those doors is a living room that is now being worked on. And you know what that means: Plastic sheets, strong tape, containment, containment, containment...
NYC Renovation Chronicles is a bi-weekly column focused (obviously) on renovation, NYC style. Helmed in the past by an architect, a kitchen and bath designer, and a general contractor, the column's new steward is co-op renovator, real estate porn addict and Harlem resident Mayra David. She'll focus on what it's like to DIY or HSI (= Hire Someone Instead) in NYC.
Related posts:
10 things I learned during my year-long renovation
5 things you may live to regret doing in your own apartment
10 first-time renovation mistakes even New Yorkers make
Want to renovate? Here's how to get the money
Here's why you may be overpaying for your NYC renovation
NYC Renovation Questions: What should I ask when checking my contractor's references?
Can't afford/find a two bedroom apartment? The right one-bedroom just might work
NYC Renovation Questions: What should I know about converting a tub to a walk-in shower?
Here's why you may be overpaying for your NYC renovation
NYC: 5 ways to save on your bathroom renovation


