Gallery walls are a timeless and classic element of design, adding great color, individuality, and interest to any space. One of the best things about them is that there are no real hard and fast rules. If you want to make a floor to ceiling gallery wall that covers an entire wall like wallpaper, you can! It's been done and it looks great - busy, but if done well, great. You can make a few gallery walls in different areas of your space and keep them smaller. You can make one large gallery wall that just centers over a piece of furniture but doesn't cover the full wall - all options usually wind up looking great. Also, if your space is mainly decorated in neutrals, a gallery wall is a great way to add color. Hanging one may seem like a daunting prospect but there are a few easy steps you can follow to simplify and streamline the process, making it a fun and creative project for a rainy afternoon—with results that will definitely be worth the effort!
Supplies:
• A large roll of kraft paper
• Scotch tape
• Framed art
• Hammer
• Picture hooks
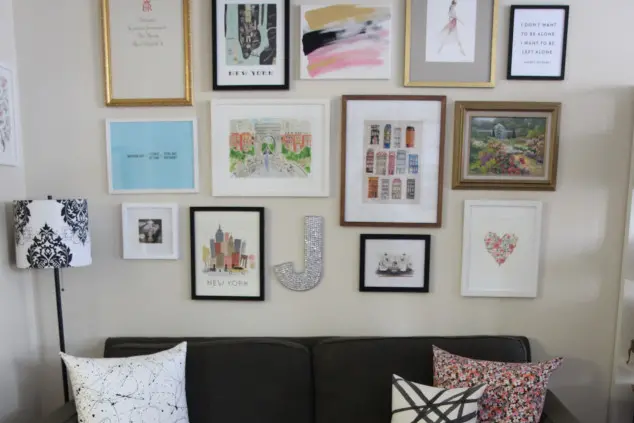
A gallery wall at the Kips Bay Decorator Showhouse/photo by Jacqueline Clair
Step 1: Gather framed art
When picking art for a gallery wall, keep in mind that there are, in many ways, no limits. You can go with all black-and-white pictures in black frames for a monochromatic look, or mix things up with a selection of natural wood frames and painted ones, showcasing different types of art, from illustrations and drawings to paintings and photographs. Vary up the shapes with circular frames and other unusual shapes; in fact, objects work well, too. There really are no rules—your taste and existing decor will determine whether you want a more monochromatic or a more eclectic look.
Note: It's important to make sure all of the frames are high-quality—no plastic—for a tailored, high-end look.Affordable frames are available at places like Pottery Barn, West Elm, and Crate and Barrel, or you kan use a professional framer.
Step 2. Make cutouts
Next, make cutouts that will stand in for your art. If you just start hanging frames willy-nilly without a plan, you're going to wind up with lots of holes in the wall when you make a mistake and hang a picture too high or too low or too close together. Making cutouts helps to obviate this problem. Cut Kraft paper in the exact size and shape of each frame you're hanging. These cutouts act as stand-ins, simulating how the art will look on the wall.
Since you'll have these paper cutouts that are the exact size and shape of each frame, you can simply tape them on the wall and arrange and rearrange to your heart's content without making holes in the wall that you might regret! Making the cutouts is easy. Simply trace your frame onto the Kraft paper and cut out the shape. Do this for all of your frames.
Step 3: Mark where your nail needs to go
This next part is important. Find the spot on your frame where the nail will need to go to hang it. Make a mark on your kraft paper cut out that corresponds to that spot. Be as precise as possible.
Step 4: Mock it up
Using scotch tape, start taping your frames up in the arrangement that you think will look best. Chances are, you will wind up taping and re-taping and rearranging everything several times before it looks the way you want it to look. That’s why it’s great to do the mock version before putting holes in the wall.
Step 5: Perfect your arrangement
Take a step back and look at your arrangement. The goal is to make it look random and not too perfect or overly arranged. A good starting point is the biggest frame, which you can use as an anchor point and arrange the others from there. Some like to put their anchor point right in the middle—I prefer putting it in the top left corner because my eye just naturally moves from left to right. Do whatever looks right to you.
Try not to put your pictures in rows, but rather to create more of a random zigzag, varying shapes and sizes of frames as you go. Don't arrange them in size order—be sure to mix it up. Aim to keep the space between each frame fairly consistent. Some people like a tight arrangement, with little space between each frame, while others are happy with a looser arrangement. This will depend on your preference, as well as the number of pieces you have to hang, and how much wall space you have to work with. The choice is yours in terms of how much of the wall you choose to cover. You can make a small gallery wall, or you can literally cover the entire wall like wallpaper. Or, you can make a medium-sized arrangement. Just be sure that if you're hanging over a couch or table, the arrangement is loosely centered over that furniture piece.
Step 6: Hang the pictures
Once you have your faux arrangement looking perfect, it’s time to hang your actual frames. Your cutouts act as proxies for your real frames, and show you where each will be hung. I recommend using these picture hooks, which are widely available at hardware stores or on Amazon. Now is when that little mark that you made on each cutout is going to come in handy. Line the curved part of the picture hook up with the mark that you made on each cutout, and then you can literally just hammer the nail in right through the kraft paper. Remove the cutout, and voila!
Jacqueline Clair writes about interior design, fashion and NYC living on her blog,York Avenue.
Brick Underground articles occasionally include the expertise of, or information about, advertising partners when relevant to the story. We will never promote an advertiser's product without making the relationship clear to our readers.