


.jpg")


Build your own raised backyard veggie garden: an 8-step DIY guide
Longtime New Yorkers Angela Tiffin and Andrew Nichols bought their first brownstone in South Park Slope in May 2012, and have spent two years renovating—first, their own duplex apartment and, in recent months, a third-floor rental unit—much of it with their own hands. You can read more about the project at their blog, Brownstone Cyclone.
When you own a brownstone, you're likely to wind up spending most of your weekends indoors, working on home improvement (that's definitely been true for us). While the summer weather lasts, we thought we’d treat ourselves to working outside for a change, in the backyard garden.
Since our house is over 100 years old, we had no idea what had gone on in the backyard for the last century. And since there was a lot of leftover construction debris on the surface, we started out by having the soil tested in the area where we wanted to grow food to make sure it was safe.
We sent off a surface soil sample in the mail to the Environmental Sciences Analytical Center at Brooklyn College. For about $45, you can get a basic soil quality test that will tell you the lead levels, soil PH, soluble salts and the class of your soil. We figured we're not experienced enough gardeners to bother with a full nutrient breakdown at $75. (A basic lead test will only set you back $10.)
And it's a good thing we sprung for the test; our lead level came back as 752! For context, experts recommend not allowing children to play—or attempting to grow leafy vegetables or root crops—in soil with lead levels over the 400 mark, unless you do so in raised beds built with non-contaminated soil and organic amendments.
So, a raised bed with timber framing it was! We also wanted to add drip irrigation so that we could automate the watering process. To get started, we used the following supplies:
- a shovel to dig trenches and move soil around
- an axe to cut roots
- debris bags to put the contaminated soil in
- wheelbarrow to move soil around
- some sort of timber for framing the box, in our case pressure treated 4x4s
- ½” PVC pipe with elbow and T fittings
- PVC pipe glue
- 6’ level
- 6” lag bolts rated for outdoor use with pressure treated lumber
- 1 piece of ½” x 3’ rebar for each corner join
- a long ½” drill bit
- drill
- driver
- speed square (a triangular measurement tool that costs about $20)
- 3 lbs hammer

Before: the garden area, with brick border.
Step 1: DIG TRENCHES
We needed to dig a 6” trench to accommodate some of the timber framing. In our case, we decided to bury one layer of the timber 4x4s as a base so the framing would align with the framing we did earlier in the summer for the grass (you can find a step-by-step breakdown of that project here). We dug about 6"deep—enough that when we put down the first layer of 4x4s, it was almost completely below grade (or underground), though really, you only need to dig deep enough that the frame will be solid and not easily knocked over. First, we had to remove the double brick border with a hammer and chisel. This was back-breaking work, but we got it done in a few hours. (Note: we hung on to this brick to re-use in step four.)

Removing the bricks.
Step 2: TURN OVER THE SOIL AND REMOVE ROCKS AND ROOTS
Now is also a good time to remove any dubious topsoil and as many rocks and roots as possible.

The finished trench.

Flowers we had to relocate.
Step 3: LAY THE IRRIGATION PIPES
We wanted to install an irrigation system to automate the process of watering the garden. Here, we ran PVC pipe from our garden hose valve behind our fence and then along the inside of the planned planter box walls. We planned 3 boxes (two for flowers and one for vegetables) in a straight line so this was pretty straightforward. In the corner of each box we used a T fitting and installed pipe straight up in the air a few feet. (Note: it's ok that these pipes are white and ugly because you are going to bury them out of sight later.)

PVC - pipe attached to an automated timer and garden hose valve.

Pipes in trench.
When fitting the pipes, we recommend laying everything out, cutting all the pipes and fitting everything together without the glue first so you can figure out how it all goes together. Once everything is in place pull it apart and glue each joint together. Glue caps onto any open ends so the entire system is closed. Allow the glue a few hours to dry. Once the glue is dry, test it by attaching the water supply and turning it on all the way to place pressure on all the joints for about 30 minutes. The time to check for leaks is before the pipes are buried underground.
Step 4: BUILDING THE BOXES
For this step, we used the bricks we removed in step one as a sort of foundation for our 4x4 walls (some of these came out whole and others were in fragments from the removal process). Starting in one of the corners, we packed the soil with a brick and then laid a brick about every three feet along the path where we planned to put the 4x4s, and filled the spaces between them in with smaller rocks to create a foundation and a layer which would allow water to drain away from the wood. We used a 6’ level to check that each set of bricks were at the same depth. Be sure to pack the soil under the brick as you measure depth. If you don’t, the soil will settle and the boxes will look wonky in a few months.

Pipes with bricks and rocks.
Now comes the cutting. First we sorted through all our 4x4’s and found the sides with the least flaws to face outside. Next, we started cutting them down to size using a 12” power miter, and laying them onto the bricks. Once the entire first layer was laid out, we used an impact driver to drive a 6” lag bolt through the side 4x4 into the end of the adjoining 4x4. Be sure to do this a little off center as later you’ll be drilling a hole down the center of each joint for the rebar.
When installing subsequent layers of boards we alternated which board sits on top of each corner and screwed the ends together as we did with the first layer (see photo below). Overlapping this way makes the corners of the boxes stronger. Next, we drove a few bolts directly down through the top of each layer into the 4x4 below every 3 or 4 feet to strengthen the longer sides of our boxes. Do not attach the top layer yet.

Corner joint.

T joint.
Step 5: ADDING THE TOP LAYER
Before attaching the top layer, drill a hole with a ½” drill bit straight down through all of the board on each corner. Using the 3 lbs hammer, drive the ½” rebar through the hole and leave about 1.5” protruding from the top (see below).

Protruding rebar.
Now comes the slightly challenging part. We didn’t want the rebar to show, so we drilled a hole part way through the bottom of the top boards to accommodate the protruding rebar. (Tip: Measure three times before you drill, because you only have one shot at this. ) To mark the spot we needed to drill, we first lined the boards up next to the rebar and marked the side of the board. We found that a speed square was useful to to extend those lines across the bottom of the board and again to measure the distance from the side of the board to both sides of the rebar. We transferred those measurements to the top board.
Place the top boards over the rebar holes and pound them down with the 3 lbs hammer. We used a piece of scrap wood between the hammer and top board to avoid damage to the top layer. Once these are all together, screw in a few 6” screws to tighten it up, and you’re done with the framing.

The finished frames.
Step 6: LINING THE INSIDE
Along the insides of all boxes we installed landscaping paper. This prevents weeds from growing out the sides anywhere there is a large gap in the frame. Since there is some controversy around using pressure treated wood for vegetable gardens, we took the precaution of also lining that planter box with heavy plastic.

The landscaping paper.
Step 7: BACK FILL THE DIRT
With the boxes and irrigation done, you can start filling in the dirt. For about the top 6-8” of the veggie garden, we purchased a good quality organic topsoil from a local garden supply. At $2 a bag, we used about 15 bags and then added some compost materials.
Step 8: FINISHING THE IRRIGATION
There are many ways to do this. Installing sprinklers is one option, but in our case, we used drip irrigation hoses because we already owned them. First, we dug out some of the dirt around each of the pvc pipes that were extending straight up and then cut them down to a little below the soil level. On the end of each pipe we glued a elbow joint with a threaded end and attached a metal ¾” male adapter to fit garden hoses. We took our old drip hose and cut the hose down to fit each box and attached female ¾” garden hose attachment.
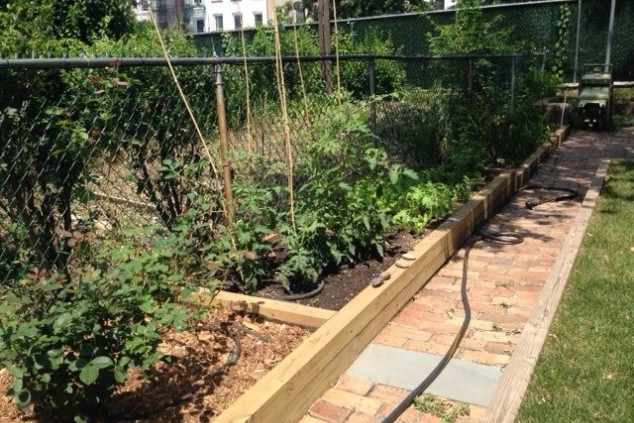
With everything attached we turned on the water and viola we have irrigation (see the photo at the top of the story). We set the timer valve so that all the boxes get watered each morning and while we're out of town this summer. One more home improvement project checked off the list, and we got a little sun.
Related:
5 steps for installing a lawn in your brownstone's backyard
The great NYC outdoors: FAQs for those lucky enough to have terraces, roofdecks, and gardens
How to start a garden in even the smallest New York apartment


