


5 Steps For Installing a Lawn in Your Brownstone's Backyard
Longtime New Yorkers Angela Tiffin and Andrew Nichols bought their first brownstone in South Park Slope in May 2012, and have spent two years renovating—first, their own duplex apartment and, in recent months, a third-floor rental unit—much of it with their own hands. You can read more about the project at their blog, Brownstone Cyclone.
When it came time to think about landscaping our own backyard, we considered all our options. There's no question that a finished backyard will add value to your home, but on the flip side, people will tell you that a patch of grass, no matter how small, is expensive and labor-intensive. After a cost-benefit analysis, we quickly came to the decision that the benefits of having a small lawn for our daughter and dog to play on far outweighed the inconvenience and cost—which is really pretty reasonable.
When we first purchased our brownstone in Brooklyn, the backyard had already been neglected for years. By the time we moved in it was overgrown and had a few rat carcasses, plus mosquitoes galore. Construction took a further toll on it as mounds of demolition waste were piled over the weeds.

Our backyard looking haggard after construction clean up.
Here are the steps we followed to turn our overgrown pile of rubble into a lovely little green space.
Step 1: Clean up
First, we had to remove all the debris and rocks from the area. It was a bit labor-intensive moving garbage and dozens of large rocks. (And disappointing, too, because we found zero historical artifacts, buried treasure or Jimmy Hoffa remnants). We filled about 25 demolition bags of excess dirt that had piled up and called a garbage removal company — really, a man with a van — that came and took it away.
The demolition bags are available at Home Depot and work much better than plastic garbage bags in holding dirt, rocks, cement bits and the other debris we needed to remove.
We also removed a sad little pine tree and it’s root system, which we did ourselves for about $30.

Removing the dirt — we filled about 25 demolition bags.

This is the yard just after we removed the tree.
Step 2: Smooth out the soil
With all the construction debris, large rocks and tree roots cleaned up, we were left with a rather sloppy pile of dirt. At first we thought we’d try to level out the lawn until it was completely flat. Unfortunately, upon closer inspection, we realized that in the back of the yard around the remaining tree the dirt was about six inches higher than in the front of the yard. To make it flat we’d have to add significantly more dirt and build a larger retaining wall around the yard. Instead we decided to create a slope from the highest points around the tree down to the lowest points along the front of the retaining wall.
Using a rake and some shovels we spread the dirt around in an attempt to create a nice, smooth slope running from the base of the tree to the 4x4s framing the lawn. In an attempt to keep this smooth and straight we ran a mason’s line (a brightly colored string used to level) from a stake at the base of the tree to the 4x4s. We attempted to smooth the dirt to about three inches below the string.
This is harder than you would think, as you need to pack the soil after you smooth it out and we didn’t have any good tools for packing. If we could do it over we’d probably take a 2-by-6 and try to drag that across the soil to smoothe it out and walk on it to pack it down evenly. I would also get the soil nice and wet and let it sit for a week to really settle out before doing any more.
Step 3: Fertilizer and compost
As with most growing projects, it’s recommended that you mix some amendments—i.e. fertilizer and compost—into the topsoil. Organic matter is supposed to help improve soil aeration and water retention. Using a rake, we simply mixed in a few bags from the hardware store and created a mixed layer of about 1 to 2 inches, again making every effort to keep everything nice and smooth.
Step 4: Time for sod!
We consider ourselves DIYers, yes, but we're not masochists. The idea of growing a lawn from seed has its appeal but we wanted instant gratification and we still had a lot of other projects on our list. Luckily, the local Home Depot offers Kentucky Blue Grass sod at what seemed a reasonable price. Our lawn is only 10 feet by 25 feet so the sod cost about $180, money well spent.
The sod was easy to install: We put down our first row starting at the back of the lawn furthest from the tree, then offset the second row by half a sheet to create a brick pattern using a utility knife to cut sheets down to size. Our yard is so small that we only required about five rows before we were done.
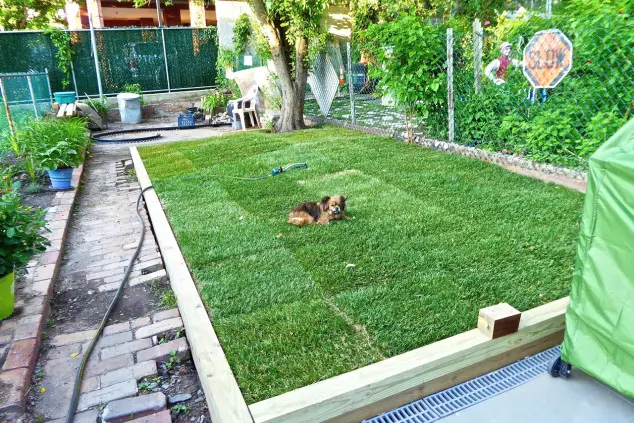
We watered the lawn liberally for the next two weeks and we (grownups) didn’t walk on it at all. The grass grew so well and high we had trouble mowing it with our manual mower that second weekend.

Sod half-installed.
Cost and upkeep materials
Garbage and dirt removal: $250
Sod: $.72 per sq ft = $180
Lawn mower: $84
Grass shears: $16.98
Fertilizer & compost: $50
Total: $600
You do have to care for your lawn by mowing it and doing some occasional weeding, but in our opinion, the overall benefits far outweigh the costs.
Related:
NYC hack: turn your backyard into a home office with a high design "shed"
The great NYC outdoors: FAQs for those lucky enough to have terraces, roofdecks, and gardens
Leaky pipe alert: the insurance option all brownstone owners should know about
4 common brownstone leaks—and how we (mostly) fixed them
Buying new kitchen cabinets? What you need to know


