


A Brooklynite’s step-by-step guide to installing kitchen cabinets
Longtime New Yorkers Angela Tiffin and Andrew Nichols bought their first brownstone in South Park Slope in May 2012, and have spent two years renovating—first, their own duplex apartment and in recent months, a third-floor rental unit—much of it with their own hands. You can read more about the project at their blog, Brownstone Cyclone.
We recently went through the (surprisingly complicated) process of choosing kitchen cabinets for our brownstone—both for our owner’s duplex and a rental unit on the top floor. The next step: installing the cabinets, which we decided to tackle ourselves. Although we made a few mistakes along the way, overall it was a pretty easy job, and we regret spending the money on hiring a professional on past kitchen projects. Below, what we learned in the process:
Take inventory
The first thing I did [Ed’s note: Andrew takes over the story here] after our cabinets arrived was to open all 10 boxes to look for any damage to the cabinet boxes and doors. It’s particularly important to discover missing or flawed cabinet boxes before you start installation. No one wants to unearth a problem when half the cabinets are installed and you have to wait a few weeks for a replacement with a half-finished kitchen on your hands. Luckily for us, we only had one warped door, which isn't as big a deal because they can be replaced after the installation. In our case, we had both wall cabinets (which affix to the walls) and base cabinets (which go under the counter).
Assemble your tools
You’re going to need a bunch of them: a level, chalk line, pencil, wood shims, stud finder, drill, driver, jigsaw, table saw and chop saw. Depending on the number of cabinets, you’ll need one box of 2.5-inch zinc coated wood screws, one box of 1.5-inch zinc coated wood screws, cabinet washers, and enough 2x4s to cover the length of the wall where you’re hanging the wall cabinets.
Mark up the wall
To prepare the kitchen walls, I used my stud finder and a small nail to locate the center of all the wall studs. Then, using the level, I penciled in lines extending above and below where the wall cabinets would hang. I was going to put the 2.5-inch wood screws through the cabinets and into these studs later and this would make them easier to find.
I also recommend marking the walls to show the left and right edges of each cabinet. Your kitchen designer will provide a diagram illustrating all of the cabinet locations, but if any of the measurements are off it’s better to discover that now, rather than after you’ve hung a few cabinets—as I discovered when I mistook a ¾-inch measurement for a three-inch measurement and had to rehang three wall cabinets.
Above, the ledger board is in place with all the studs marked.
Install a ledger board
A ledger board is simply a 2x4 or smaller board which is screwed into the wall with the 2.5-inch nails to help hold up the wall cabinets while we put them up. Typically, the bottoms of wall cabinets sit 54 inches off the floor. As with many old houses, our floor is about ¾ inches out of level, so I found the highest point in the floor and measured 54 inches up. Next, with some assistance from Angela, I snapped a level chalk line at 54 inches and attached the 2x4 along the line with wood screws into some of the studs.
Attach the wall cabinets
While I was confident I could install the cabinets alone, my wife wasn’t—and I have to admit she was right. I asked a buddy to help out, and the job was much easier with two people.
First, we removed all the cabinet doors to make the pieces lighter and easier to work with (plus, you avoid the risk of damaging them).
Above, the zinc coated screws and cabinet washers look like stainless but are much less expensive.
We started with the wall cabinets because it’s difficult to maneuver around the base cabinets if they’re already in place. We positioned the first one on the wall and, while my buddy held it in place, I drilled pilot holes through the back where the studs were located.
The backs of cabinets are typically thin, but there should be a thick strip along the top and bottom for mounting. This is where you’ll want to drill, and then install wood screws with the cabinet washers, which provide a more finished look and more surface area for the screw to press against the cabinets. We didn’t tighten them up completely because we wanted a little play while we attached the cabinets on the left and right. We repeated the process with a second cabinet.
The clamps hold the two faces tight while you screw them together.
Countersinking the screws is not necessary but will hide them.
Next, we attached the first two cabinet faces by lining them up and attaching three clamps to hold them in place. Using a countersink drill bit, I drilled three pilot holes through one of the cabinet faces and screwed them together. It’s easy to make a costly mistake at this stage by splitting the cabinet face, so we went slowly and carefully.
It’s also easy to make a time-consuming mistake by not checking which end is up. At first glance, it looked like the faces could be attached either way, but after hanging three of them, we realized that the bottom face was about 1/4-inch larger than the top. We remounted them.
It’s much easier to install the filler piece before the cabinet goes on the wall.
Fill in space as necessary
We continued this process until we’d hung the last cabinet, which was about two inches away from the left wall of the kitchen. This is where the table and chop saws got some use. To close the gap, we attached a small filler piece to the outside of the cabinet face before installing it. A filler is essentially a chunk of wood in a matching color that’s attached to the cabinet face to close gaps between two cabinets or a cabinet and the wall. In our case, the designer provided a three-inch filler, which we ripped (cut length wise) and chopped (cut width wise) down to fit the two-inch space.
With all the faces attached, we removed the ledger boards and tightened the wall screws. In our case, the wall was straight and level, so this was easy. If your wall is uneven, slide shims in between the cabinets and wall until everything is level as you tighten it up.
The floor in the back of the cabinet is a bit higher than the front so we added shims to make it level.
Install the base cabinets
We started with the corner cabinet again, as this was the highest point in the floor. This is very important because the base cabinets need to be level with each other, and you can only shim the other cabinets up to the height of the highest one. Using shims we leveled the corner cabinet and then drilled pilot holes and screwed it—not quite all the way—into the wall studs.
My buddy Keith cutting out the back of the sink cabinet.
With holes for the plumbing, the cabinet should slide in pretty easily.
The next one was the sink cabinet, which required some extra work to accommodate the plumbing and waste disposal electrical line. First, we lined the cabinet up with the wall and marked out where holes for the plumbing would go. Using the jigsaw we cut out each hole and slid the cabinet in place. After installing shims underneath to level it out, we screwed it into the wall and then attached the faces just as we did with the wall cabinets.
Another mistake: we should have tested the placement of the corner cabinet first—we didn’t discover until afterwards that one of the drawers was hitting the dishwasher, which meant we had to unmount the corner and sink cabinet and cut larger holes in the back of the sink cabinet to accommodate its new home about two inches to the right.
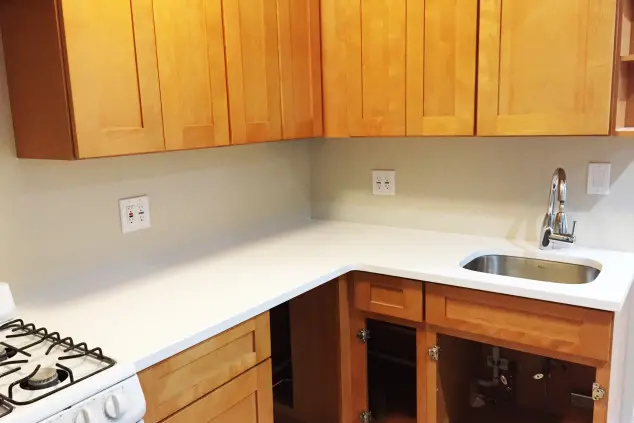
The sink cabinet in its final home. Note that all the holes are really slots because we had to enlarge them to move the cabinet to the right.
With these two finally in place, we positioned the third cabinet, which sits between the dishwasher and stove, so it has no adjacent cabinet faces to attach to, just the wall.
All the cabinets in place with most of the doors on ready for the countertops.
With the cabinets in place, we can have the countertop maker create a template for our counters. I strongly recommend you install any additional plumbing or electrical work your cabinets need before the counters come. It’s much easier reaching down into the cabinets than crawling through the open doors.
Related:
Buying new kitchen cabinets? What you need to know
What's the best way to add lights under our kitchen cabinets?


