


Staining wood: the easier alternative to paint
Painting is a great way to refresh a room, but it can also give a space a heavy feel (and if you've just spent days stripping layers of paint off your door frames and windowsills, you probably don't want to slather it on again).
Staining wood, on the other hand, lets you play with color--you can mix shades of stain just like you would paint--without having to worry about brush strokes or paint drips.
Plus, we had new, bald pine doors between the dining and living rooms, which contrasted with everything else around them, from the slightly uneven walls to the prewar painted trim.
Choose your color
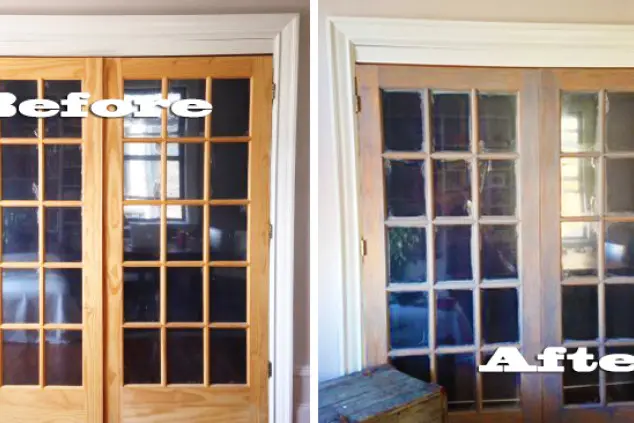
To make sure the new doors blended with our other decor, we opted for a grayish, weathered look. To achieve it, I used a light, white stain that DIYers often called a “pickling” stain. It gives the surface the look of old wood that has traces of white paint from a bygone era.
I had some black stain, known as “behandela,” left over from a previous IKEA project. I mixed that with the pickling white stain and got a lovely light gray.
Above, an old trunk from a neighborhood stoop sale served as inspiration for the project.
Prep the surface
The first step to any staining project is to apply a pre-staining conditioner, such as this one by Minwax. I can’t stress this step enough. Wood is unpredictable in how it absorbs stains, and a conditioner will help avoid blotches by seeping into the wood grain, essentially filling in spots that may soak in too much stain later.
It can be applied with a brush or rag, but take care to get into the nooks and crannies, or the stain will absorb unevenly in those areas. Let the conditioner sink in for about 5 to 10 minutes.
Above, the left side of this wood piece was treated with conditioner, resulting in a more even stain.
Apply the stain
The key to combining stains is to remember your proportions. That way you have a formula to follow if you need to mix more. After testing different blends on spare pieces of wood, I used a ratio of three parts white stain to two parts black stain, and stirred them together in a small tub.
Above, mixing the black and white stains
Use a rag, brush or both to apply the stain. I like to use both because a rag gives more control over where the stain goes--there are hardly any drips--while a brush gets into the small corners. Either way, don't let the stain pool on the surface or it'll create a dark spot where it rests. Use straight, even strokes.
Above, applying the stain didn't take long
After just half an hour, I had stained an entire door. Even with the conditioner, the stain absorbed unevenly in some spots. But I don’t mind that. I like a little bit of variation in the color, since the whole point of this project was to have fun and give these new doors an aged look to go with their prewar surroundings.
Above, the finished product has a weathered look that matches other elements of the apartment
Related:
Strip decades of gloopy paint off your walls: Our writer tests a few methods to find out what works


