


Brighten up a long, dark hallway with a DIY facelift
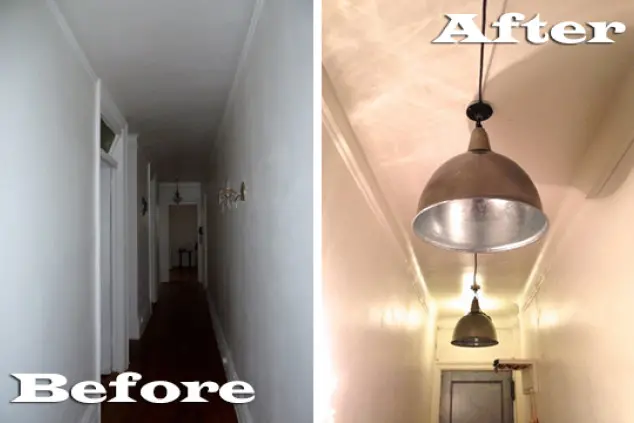
From day one, the 38-foot-long hallway extending from the front entrance of our prewar apartment to the little vestibule off our living and dining rooms was a sore point. It took up a lot of square footage that served little function except as a dumping ground for junk mail, shoes, winter accessories and even our ladder. No natural light could reach the part closest to the front door, and the artificial light—a hanging fixture near the door and a wall sconce sticking out randomly halfway down the hallway—was ugly.

A view of Mayra's hallway from the front door--taken with flash photography.
This was the first impression of our home--and we all know what they say about first impressions.
Let there be light
We chose to tackle the problem right away. We briefly considered track lighting, which I often see in long, dark hallways, but I wasn’t in love with the look. It felt too refined, and as you can tell from my kitchen redo, we like an industrial, not-too-polished aesthetic.
Since the industrial look is so on trend (and yet timeless!), there were tons of options in stores and online. For real vintage finds in the city, head to Build It Green! or Demolition Depot, which sell furniture, fixtures, and even doors and stair banisters salvaged from buildings around the city. Or check out Olde Good Things, another source for architectural salvage. Just be prepared for high prices!

Mayra took inspiration from this industrial light fixture (Photo credit: Remodelista)
But it turned out we didn't have to go either route. One day, my father came across some industrial lights lying by a Dumpster in a parking lot in Las Vegas. He spoke with the owners of the building that was being demolished and got permission to take four of them home with him. They were old, dinged up, and needed to be rewired. Not a problem for my dad, who is a great handyman.
When I saw the lights, I loved them right away. But at about 18 inches across and 19 inches tall, I was afraid they would be too large for our apartment. They were true industrial lights, meant to be strung up from 15-foot ceilings, not the “industrial chic” residential ones you get at West Elm. Still, I thought they could work.

Mayra's dad found some truly industrial fixtures that could be spruced up.
While I liked the cool aluminum shell, I wanted to warm it up. I picked a spray paint color in a metallic goldish green tone called “Rosemary” (see photos below), and went to town in my parents' suburban backyard.

Before and after the spray paint treatment

A close-up of the new color
The next step was to hang the lights, which took an afternoon. Since there had never been any overhead lights in the hallway (except right by the front door), we had a blank canvas to work with.
My dad bought outlet boxes and box covers to secure these heavy hitters to the ceiling and to wire them to each other so they would turn on and off from a single switch (the one by the front door). If you don’t know anybody who can do this type of wiring, you will have to hire an electrician.

But first, we marked down where they would hang to make sure they were spaced evenly along the hallway--one about every eight feet worked well for the space. We ended up using only three of the four lights. Using all four would have crowded the ceiling. Then, using a spade drill bit, we drilled holes into the ceiling and secured the outlet box and box cover with toggle bolts.

The DIYer at work
The three pendants dangled beautifully above at the perfect height. However, they really couldn't have been any taller than 19 inches. After holding one up to the ceiling to eyeball the placement, it became clear that, with the thickness of the box covers and a bit of exposed wiring, the lights should drop down to about 22 inches from the ceiling. Any lower and they would become a visual distraction.
Instead of hiding the thick black cable that linked the lights together in some kind of plastic wiremold, we decided to leave it in plain sight, running from one to the other with some slack, for a more casual look.
To get power to the three lights, we retrofitted the end of the wire that connected them with a plug, rather than hardwiring them--which would have entailed removing the old light fixture by the front door, rewiring things and patching up holes in the ceiling.
Instead, we took advantage of the old light fixture and, essentially, turned it into an electrical outlet for the new pendant lights by removing the decorative glass globe that covered it and screwing a socket plug adapter into its socket (where the lightbulb used to go). The light switch by the front door now turns on the three new lights. We replaced the old switch with a dimmer switch, too!
Again, get your super or another professional to help if you don’t know how to do this. I still don’t.

The new look in the hallway
The pendants look great (see photo above), and the light they give is gorgeous! The one catch? All of a sudden with the hallway illuminated, it's become much clearer what work still needs to be done.
Next up: painting!
Related posts:
Redo your creaky, crooked kitchen floors in a long weekend: Part two
Redo your creaky, crooked kitchen floors in a long weekend: Part one
NYC Renovation Chronicles: A step-by-step guide to a DIY kitchen backsplash
NYC Renovation Chronicles: Where to find inspiration that actually works in a NYC apartment
NYC Renovation Chronicles: 3 DIY projects worth trying yourself


